Having Internet access at home is convenient, but wouldn't it feel good to relax on the couch while you check your bank account balance or shop online? At the same time, your daughter could research that book report on her computer while using the same wireless network connection that you're using. When you set up a wireless home network, it's all possible—and it's a lot easier than you might think.
What is a wireless home network?
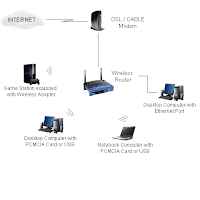
A home network is simply two or more computers in your home that are connected to each other and can share files, printers, and your Internet connection. In a wireless network, the computers are connected by radio signals instead of wires or cables, which is perfect for mobile PCs: notebooks, Tablet PCs, and ultra-mobile PCs.
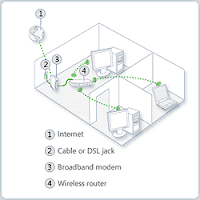
Illustration of a wireless home network

A wireless home network
The good news is that having a computer network in your home is no longer as expensive or as hard to set up as it once was. In just an afternoon, you can make viewing your bank account or researching that book report from anywhere in the house a comfortable and convenient reality.
The right equipment
Before you can set up your wireless home network, you need the following things:
* Broadband connection and modem
* Wireless network adapters and a wireless router
Broadband connection and modem
A broadband connection is a high-speed Internet connection, in contrast to a dial-up connection, which is slower and is not powerful enough for a wireless home network. There are different types of broadband connections. DSL and cable are two of the most common ones. You can get a broadband connection by contacting an Internet service provider (ISP) that offers broadband service. ISPs often provide the broadband modem as well, and may even install it for you.
After you have a broadband connection and modem, you can get the rest of the hardware that you need for your wireless home network.
Wireless network adapters and a wireless router
A network adapter is a hardware device that connects your computer to a network. Most mobile PCs—and many desktop computers—come with a wireless network adapter already installed. You can check each of your computers yourself to see whether they have wireless network adapters. Here's how to determine whether a computer has a wireless network adapter:
1. Click the Start button Picture of the Start button, click Control Panel, click System and Maintenance, and then click System.
2. In the left pane, click Device Manager.
3. Next to Network adapters, click the plus sign (+).
4. Look for a network adapter that includes "wireless" in the name.
If one or more of your computers needs a wireless network adapter, you can purchase it from a store that sells computer accessories, and then install it yourself.
If you do need to buy wireless network adapters, it's a good idea to get the same brand as the wireless router that you buy. Hardware from the same manufacturer often works better together than hardware from different manufacturers. For more information, see Wireless networking: frequently asked questions in Windows Help and How-to.
Where to put your wireless router
Follow these tips for placing your wireless router in an area that will give you the strongest signal strength and best connection.
* Position your wireless router in a central location. Avoid placing your router next to an outside wall of your home. Most router antennas are omni-directional. This means that the signal radiates from the antenna in all directions equally. Place the router as close to the center of your home as you can to increase the strength of your wireless signal throughout your home.
* Move the wireless router off of the floor and away from walls and metal objects, such as metal file cabinets. Putting your router on the floor, or next to walls or metal objects, can diminish the signal strength, because the router's signal is broadcast in the shape of a sphere. The fewer physical obstructions between your computer and the router's signal, the more likely that you'll be using the router's full signal strength. This means a stronger Internet connection from greater distances in your home. For more information, see 10 tips for improving your wireless network.
* Reduce wireless interference. Your cordless phone or other wireless electronics are sending signals, too. If they're close together, they may interfere with each other. You can help prevent interference by changing the location of your cordless phone base station, changing the frequency channel on your wireless router, or avoiding wireless electronics that use the 2.4-gigahertz (GHz) frequency. If you have trouble reducing the amount of wireless interference, look for cordless phones and other wireless electronics that use the 5.8-GHz or 900-megahertz frequencies.
* Upgrade 802.11b devices to 802.11g. The 802.11g standard is the high-bandwidth successor to 802.11b, and it's nearly five times faster. This increased speed is noticeable if you're sending information from one computer to another on your home network—for example, sending pictures from your mobile PC to your desktop computer—however, it's not as evident when you're simply accessing the Internet. If you're adding a computer to an existing network, you may want to upgrade the other components to 802.11g at the same time.
After you purchase all of the pieces, you have your broadband connection, and you know where you're going to place your wireless router, you're ready to put together your wireless home network. Follow the instructions that came with your router and network adapters, and then activate your router—set the user name, password, and IP address—according to the instructions from your ISP.
Help protect your network
After you set up your home wireless network—but before you connect to the Internet—it's time to help protect it with a few security measures: a network security key, wireless router security, and firewalls.
Network security key
Just as file cabinets have keys and safes have combinations, wireless networks have a network security key, a password that can help protect wireless networks from unauthorized access. Because wireless networks can be seen by outsiders who can pick up the signal, you need to protect your personal information and files.
To establish a network security key, simply run the Set up a wireless router or access point wizard, which makes your network private by issuing a network security key. The wizard also helps you configure a wireless router or access point, set up file and printer sharing, and connect other computers and devices to your network. Here's how to run the Set up a wireless router or access point wizard:
1. Click the Start button Picture of the Start button, click Control Panel, click Network and Internet, and then click Network and Sharing Center.
2. In the left pane, click Set up a connection or network.
3. In the Choose a connection dialog box, click Set up a wireless router or access point, and then click Next.
Wireless router security
There are two additional methods of securing your wireless network: Wired Equivalent Privacy (WEP) and Wi-Fi Protected Access (WPA).
WEP is a basic security measure that comes standard with most routers. It helps to protect your wireless network from unauthorized access by requiring users to enter a network security key before connecting to the network.
WPA is a more robust security measure than WEP because, rather than simply requiring a network security key to access the network, it provides user authentication so that hackers are less likely to gain access to your network. However, WPA doesn't come standard on some routers. For more information about WPA, see your router manufacturer's website.
For more information, see Making your network more secure in Windows Help and How-to.
Firewalls
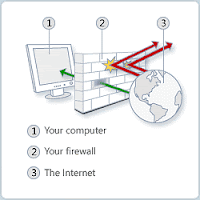
A firewall is hardware or software that can help protect your computer from hackers or malicious software, which is software designed to deliberately harm your computer (for example, viruses, worms, and Trojan horses). Running a firewall on each computer on your home network can help control the spread of malicious software on your network, as well as help to protect your computers when you're accessing the Internet on public networks, such as your local Internet café. For more information, see Firewall: frequently asked questions in Windows Help and How-to.
Illustration of how a firewall can help protect a computer

A firewall can help protect a computer
For additional protection, some new routers come with a built-in Stateful Packet Inspection (SPI) firewall, which analyzes and filters out malicious data before it can access your network. For more information, see your router manufacturer's website.
Relax, that's all there is to do
Setting up a home network is not difficult, but sometimes the occasional hiccup occurs. If you need help, check the instructions that came with your hardware or search Windows Help and How-to for more information. Set aside enough time so that you don't feel rushed. In just a little while, you and your family will be sharing your Internet connection—and you'll be doing your online shopping from the comfort of your couch or the convenience of your dining room table or patio.


